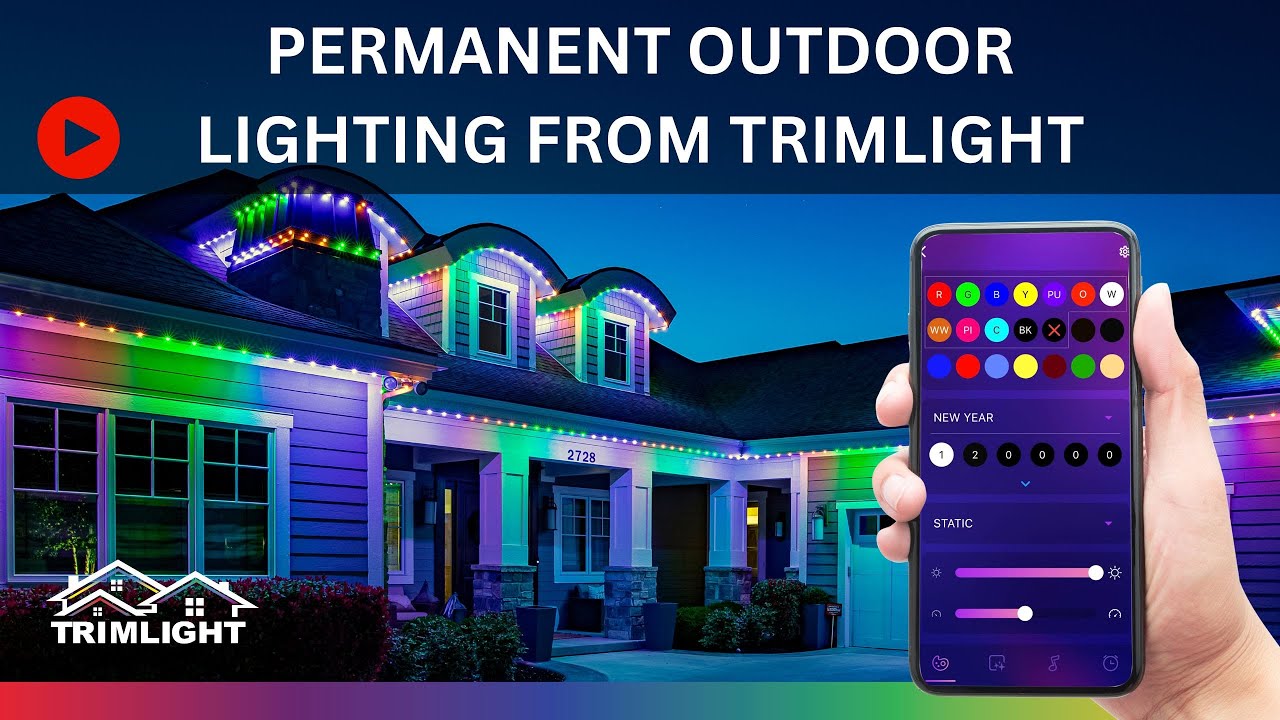
Enhancing your outside house with LED panorama lighting fixtures can drastically escalate its aesthetic charm and function. Whether you favor to light up a pathway, spotlight architectural capabilities, or create a comfy surroundings on your outdoor, suited setting up is fundamental to achieving the wanted end result. This ebook will Astrolux reliable outdoor lighting Surrey stroll you using the principal steps of setting up LED landscape lighting, ensuring that your undertaking is valuable from start to end.
Understanding LED Landscape Lighting
LED landscape lights refers to energy-powerful lighting fixtures tactics designed for backyard use. These lighting are available numerous styles and purposes, which includes pathway lights, driveway lighting, garden lights, patio lighting, and greater. The blessings of LED strategies contain their long lifespan, low strength consumption, and versatility in design.
When focused on your outside lighting fixtures, take into accounts how it's going to improve safe practices, safety, and aesthetics. For example, smartly-lit pathways now not solely forestall injuries however also upload a welcoming touch. Similarly, highlighting bushes or architectural qualities can become the atmosphere of your backyard at evening.
Planning Your Lighting Design
Before you start digging and wiring, spend time on making plans. A thoughtful structure will make install smoother and ensure that you just in attaining the preferred seem to be.
Assess Your Space
Begin with the aid of interpreting your backyard or outdoor zone. Identify key characteristics you need to illuminate—those will be trees, shrubs, entryways, or water positive aspects. Consider how these ingredients interact with ordinary mild during assorted times of day.
Create a Lighting Plan
Draw a straight forward map of your panorama and mark the place you intend to vicinity both easy fixture. The function is to create layers of faded for intensity: use direction lighting fixtures alongside walkways for protection whereas applying uplights on bushes for dramatic effect. Be aware of spacing; lighting fixtures should still be positioned Astrolux architectural lighting Surrey about 10 to fifteen feet aside for even illumination.

Choose Your Fixtures
Select furnishings centered on their motive and flavor. Pathway lighting fixtures are almost always shorter and designed to cast pale downward for defense. Uplights are put at flooring point to spotlight vertical materials like timber or partitions. Remember that coloration temperature subjects too; warm white mild (around 2700K) creates a relaxed setting even though cool white (around 5000K) gives a greater glossy sense.
Gathering Materials
Once you have got a plan in situation, gather all vital resources previously opening your mission. Here’s what you are going to aas a rule want:
LED Light Fixtures: Choose effective items proper for outside use. Low-Voltage Transformer: This converts accepted voltage from your own home into low voltage protected for landscape lighting fixtures. Low-Voltage Wire: Use direct burial cord rated for outdoor installations. Connectors: Waterproof connectors are considered necessary for secure connections. Tools: You’ll desire cord cutters/strippers, a shovel or trenching instrument if burying cables, and likely stakes or anchors for securing furniture.Step-by-Step Installation Process
With your parts prepared and plan frequent, stick with those steps to put in your LED panorama lighting comfortably.
Step 1: Lay Out the Fixtures
Before making any everlasting transformations, location the easy furniture in response to your plan with no securing them in situation yet. This allows for you to imagine how they can appear whilst turned on at nighttime.
Step 2: Mark Cable Routing
Once glad with the placement of furnishings, mark the direction wherein the low-voltage twine will run between each one fixture and from the transformer region again to your vitality source—this will Astrolux Lighting Surrey BC be an exterior outlet or a further gorgeous connection factor.
Step 3: Dig Trenches for Wiring
Depending on local codes and private desire, you possibly can prefer to bury the twine or go away it above ground riding stakes along pathways or flower beds. If selecting burial (which is aas a rule really helpful), dig trenches roughly 6 inches deep alongside the marked direction.
Step 4: Install Fixtures
Secure both fixture in its targeted spot based on enterprise classes—this will likely contain putting stakes into the floor or solving them completely if wished. Ensure that any adjustable fixtures are oriented towards their meant objective side earlier than tightening screws entirely.
Step 5: Run Low-Voltage Wire
Lay down the low-voltage twine by means of the trenches toward each and every fixture even as making sure connections between wires are preserve making use of waterproof connectors where invaluable. Connect one stop of this wiring again to the transformer location as steered through its user manual.
Step 6: Connect Transformer and Test Lights
Following all defense precautions mentioned in product manuals:
- Connect wires from fixtures into terminals at the transformer. Plug in or switch on force at the resource. Test every one light separately previously finalizing any burial paintings; alter angles as obligatory now rather than later while everything is included up!
Step 7: Bury Wires (if suitable)
If you've chosen to bury wires underground:
- Carefully duvet them again up with soil with out unsafe insulation. Ensure no sharp gadgets penetrate by using after finishing touch—think about adding mulch over spaces as an extra defensive layer in opposition to power smash from landscaping activities afterward.
Maintenance Tips for Longevity
Regular protection guarantees that your LED panorama lighting stays powerful through the years:
Clean Fixtures Regularly: Dust accumulation can curb brightness; wipe down furnishings each few months. Check Connections: Periodically check up on wiring connections all through cleanings; change any corroded connectors straight. Adjust Timers/Sensors: If simply by shrewd outdoors lights treatments with timers/sensors adjust them situated on seasonal alterations affecting daylight. Inspect Bulbs: Although LEDs closing longer than regular bulbs inspect their efficiency every year; erroneous bulbs must always be replaced at once with like minded treatments.When Professional Help May Be Necessary
While many house owners may perhaps find DIY set up straightforward sufficient there are instances whilst hiring authorities makes feel—certainly if pastime elaborate customized designs concerning distinctive zones or sensible integration structures requiring complex electrical talents.
Professional lighting services might also aid ensure compliance with native restrictions with regards to electric paintings open air which vary widely based upon situation—and this would save you the two headaches down road as well as capability fines!
Conclusion
Installing LED landscape lighting fixtures can change into now not just how a house appears after dark but also escalate its usability throughout nighttime hours—a actual investment into either good looks and functionality! By following these steps fastidiously from planning by execution—which include protecting those amazing new furniture—you could revel in breathtaking consequences yr-spherical without unnecessary strain along manner forward in the direction of brighter nights forward!
Surrey Landscape Lighting Astrolux 17033 Fraser Hwy, Surrey, BC V4N 6V2 +1 778-786-0789